Fluke 743B Documenting Process Calibrator

We know how tough your job can be. You've got a lot to deliver in as little time as possible. So we've made it easier on you - with our multifunction 740B Series Documenting Process Calibrators. The 740 Series does the work of several tools - sourcing or measuring pressure, temperature, and electrical signals in one rugged, hand-held device.
For documentation, the 740 Series automates calibration procedures and captures your data - for easy transfer to a PC using Fluke DPC/Track software or other popular packages. And, of course, it helps you meet rigorous standards like ISO 9000, FDA, EPA and OSHA regulations.
The 740 Series is easy to use with flexible test strategies, user-entered values, custom units, even a built in calculator. And like all Fluke tools, it's rugged, reliable and tough as nails. It's like having several powerful tools in one - so you can work faster than ever:
- Calibrate temperature, pressure, voltage, current, resistance, and frequency
- Measure and source with one compact, rugged, reliable tool
- Create and run automated as-found/as-left procedures
Supports linear, square-root devices plus one-point and two-point limit switches
- Record and document results
- Transfer the results to a PC (743B and 744 only), saving the time to manually transcribe data.
Run popular instrumentation management software.
- HART communication capability lets you program and control HART instrumentation (744 only)
The Fluke 740 Calibrators, offered in three models, let you choose the
right set of capabilities for your needs:

- The Fluke 741B offers simultaneous source and measure capabilities for all common process parameters. Create and execute automated procedures and automatically capture the results.
- The Fluke 743B offers all the capability of the 741B, plus adds a serial interface for two-way communication applications
- The Fluke 744 offers all of the capabilities of the 743B, plus the ability to maintain and calibrate selected HART transmitters
without a second tool.
The 743B has all the capabilities of the 741B plus a PC interface that lets you download procedures, lists, and instructions created with software-or upload data for printing, archiving, and analysis. With its expanded memory, the 743B can hold a full week of calibrations and procedures.
DPC/TRACK Software is a specialized database that can help you manage your instrumentation and address the documentation requirements of quality programs and regulations.
Features:
Whether you are calibrating instruments, troubleshooting a problem, or running planned maintenance, the multifunction Fluke 741 Series Documenting Process Calibrator helps get the job done faster. It does so many different tasks, so quickly and so well, it's the only process calibrator you need to carry.
-
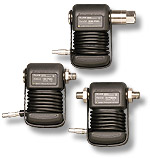
Covers virtually any pressure application including gage, differential, dual (compound), absolute, and vacuum.
-
Display pressure readings in any of 10 different pressure units you specify in the calibrator setup.
-
Rugged urethane molded cases protect the modules from rough handling and harsh conditions.
-
Features internal temperature compensation from 0 to 50 C for full accuracy performance.
-
Includes NIST-traceable calibration certificate.
addsaasdsadsadsadsads
Allow you to quickly set up powerful, automated calibration procedures for linear transmitters, DP flow transmitters, and one- and two-point limit switches. Simply select the appropriate measure and/or source functions and fill out the procedure template. The 740 Series does the rest. It quickly performs the test, calculates the errors, and displays the final results, highlighting out of tolerance points.
Enable you to map one unit to another, such as mV to C or F. Allows you to use the Fluke 740 Series with millivolt output accessories such as the Fluke Temperature Probe, and to document tests using non-supported units such as parts per million or revolutions per minute.
Enables technicians to record calibration results that were sourced and/or measured by other devices such as panel meters or readout-only devices. Procedures perform fast, automated calibration of one and two-point limit switches for voltage, current, temperature, and pressure. Routines use a square root function to directly calibrate DP flow instruments.
Multifunctional
Calibrate temperature, pressure, voltage, current, resistance, and frequency. Since it both measures and sources, you can troubleshoot and calibrate all with one rugged tool.
Powerful, yet easy to use
The easy-to-follow menu-driven display guides you through any task. Get up to speed in minutes, not days. Programmable calibration routines enable you to create and run automated as-found/as-left procedures to ensure fast, consistent, calibrations.
Records and documents results
To support your ISO-9000 or regulatory standards the Fluke 741 captures your calibration results, eliminating the need to juggle a pen and pad in the field.
Truly hand-held
Small enough to fit easily into a tool bag and to use in tight spaces. Runs an entire shift on a rechargeable NiCd battery pack.
Rugged and reliable
Count on Fluke's rugged design to deliver top accuracy and reliability in harsh environments. Overmolded urethane case stands up to rough handling in industrial environments.
Bright white display
Lets you read your results in any kind of light.
Soft keys
Provide one-touch access to enhanced functions such as task lists, automated procedures, scaling, min/max, stepping and ramping, and review memory.
Three operating modes
Measure, Source, or simultaneous Measure/Source, - enable technicians to troubleshoot, calibrate, or maintain instrumentation with just one tool.
Multi-lingual interface
Displays instructions in English, French, German, Spanish, and Italian.
Built-in algebraic calculator
With four functions-plus square root-stores, recalls, and performs calculations required for setting up instruments or evaluating data in the field. Use it to set the source function to a calculated value. There's no need to carry a pencil and paper or a separate calculator.
Programmable measurement delay
Inside automated procedures permits calibrating instruments that respond slowly.
Technical Specifications:
| Source Accuracy
|
| Range (full scale)
|
Accuracy
(% of reading + % of full scale)
|
| 110.000 mV
|
0.01% + 0.005%
|
| 1.10000V
|
0.01% + 0.005%
|
| 15.0000V
|
0.01% + 0.005%
|
| Source 22.000 mA
|
0.01% + 0.015%
|
| Simulate 22.000 mA
|
0.02% + 0.03%
|
| 11.000W
|
0.01% + 20 mW
|
| 110.00W
|
0.01% + 40 mW
|
| 1.1000 kW
|
0.02% + 0.5MW
|
| 11.000 kW
|
0.03% + 5W
|
| 0.00 to 10.99 Hz
|
0.01 Hz
|
| 11.00 to 109.99 Hz
|
0.1 Hz
|
| 110.0 to 1099.9 Hz
|
0.1 Hz
|
| 1.100 to 21.999 kHz
|
2 Hz
|
| 22.000 to 50.000 kHz
|
5 Hz
|
| Measurement Accuracy
|
| Range (Full scale)
|
Accuracy
(% of reading + % of full scale)
|
| 110.000 mV DC
|
0.025% + 0.015%
|
| 1.10000V DC
|
0.025% + 0.005%
|
| 11.0000V DC
|
0.025% + 0.005%
|
| 110.000V DC
|
0.05% + 0.005%
|
| 300.00V DC
|
0.05% + 0.005%
|
| V AC, 20 to 40 Hz
|
2% + 10 counts
|
| V AC, 40 to 500 Hz
|
0.5% + 5
|
| V AC, 500 to 1 kHz
|
2% + 10
|
| V AC, 1 kHz to 5 kHz
|
10% + 20
|
| 30.000 mA DC
|
0.01% + 0.015%
|
| 110.00 mA DC
|
0.01% + 0.015%
|
| 11.000W
|
0.05% + 50 mW
|
| 110.00W
|
0.05% + 50 mW
|
| 1.1000 kW
|
0.05% + 0.5W
|
| 11.000 kW
|
0.1% + 10W
|
| 1.00 to 109.99 Hz
|
0.05 Hz
|
| 110.0 to 1099.9 Hz
|
0.5 Hz
|
| 1.100 to 10.999 kHz
|
5 Hz
|
| 11.00 to 50.00 kHz
|
50 Hz
|
| RTD & Thermocouple Accuracy
|
| Device
|
|
| 10W Cu (427)
|
Measure Accuracy: 3 C
Source Accuracy: 1 C
|
| 100W Pt (3916)
|
Measure Accuracy: 0.3 C
Source Accuracy: 0.1 C
|
| 100W Pt (3926)
|
Measure Accuracy: 0.3 C
Source Accuracy: 0.1 C
|
| 100W Pt (385)
|
Measure Accuracy: 0.3 C
Source Accuracy: 0.1 C
|
| 200W Pt (385)
|
Measure Accuracy: 0.3 C
Source Accuracy: 0.1 C
|
| 500W Pt (385)
|
Measure Accuracy: 0.3 C
Source Accuracy: 0.1 C
|
| 1000W Pt (385)
|
Measure Accuracy: 0.3 C
Source Accuracy: 0.1 C
|
| 120W Ni (672)
|
Measure Accuracy: 0.3 C
Source Accuracy: 0.1 C
|
| E
|
Measure Accuracy: 0.3 C
Source Accuracy: 0.2 C
|
| N
|
Measure Accuracy: 0.5 C
Source Accuracy: 0.3 C
|
| J
|
Measure Accuracy: 0.3 C
Source Accuracy: 0.2 C
|
| L
|
Measure Accuracy: 0.3 C
Source Accuracy: 0.2 C
|
| K
|
Measure Accuracy: 0.3 C
Source Accuracy: 0.3 C
|
| T
|
Measure Accuracy: 0.3 C
Source Accuracy: 0.3 C
|
| U
|
Measure Accuracy: 0.3 C
Source Accuracy: 0.3 C
|
| B
|
Measure Accuracy: 0.9 C
Source Accuracy: 0.8 C
|
| R
|
Measure Accuracy: 1.0 C
Source Accuracy: 0.9 C
|
| S
|
Measure Accuracy: 0.9 C
Source Accuracy: 0.9 C
|
| C
|
Measure Accuracy: 0.6 C
Source Accuracy: 0.6 C
|
*Resolution: 0.1 C, except 1 C for 10W Cu. Best case, mid-range accuracies.
Sensor inaccuracies not included. For 2-wire
and 3-wire RTD measurements, add 0.4 C.
Thermocouple accuracies with external cold junction. For internal junction add 0.2 C.
| Technical Data
|
| Environmental Specifications*
|
Operating Temperature: -10C to 50C (-20C typical except for frequency and ac voltage measurement)
Storage Temperature: -20C to 60C
Operating Altitude: 2800 m above mean sea level (9186 ft)
Enclosure Protection: Designed to meet IEC529 IP52 (normal operating vacuum for dust)
|
| Ramp Function
|
Source functions: Voltage, current, resistance, frequency, temperature
Rate: 4 steps/second
Trip Detect: Continuity or voltage (continuity detection not available when sourcing current)
|
| Loop Power Function
|
Voltage: Selectable, 24V or 28V
Accuracy: 5%
Maximum current: 22 mA, short circuit protected
Maximum input voltage: 30V DC
|
* (all calibrator specifications apply from +18 C to +28 C unless stated otherwise)
| General
|
| Dimensions
|
130 x 236 x 61 mm
|
| Weight
|
1.4 kg (3 lb 1 oz)
|
| Internal Battery Pack
|
NiCd, 7.2V, 1700 mAh;
|
| Battery Life
|
Typical usage > eight hours
|
| Battery Replacement
|
Via snap-shut door without opening calibrator; no tools required
|
| Side Port Connections
|
- Pressure module connector
- Connection for optional battery eliminator
|
| Safety
|
Complies with CAN/CSA C22.2 No 1010.1-92, ASNI/ISA S82.01-1994, UL3111, and EN610-1:1993
|
| Data Storage Capacity
|
1 day of calibration results
|
| 90 Day Specifications
|
The standard specification intervals for the 741B is 1 and 2 years. Typical 90 day measurement and source accuracy can be estimated by dividing the one year "% of reading" or "% of output" specifications by 2. Floor specifications, expressed as "% of f.s." or "counts" or "ohms" remain constant.
|
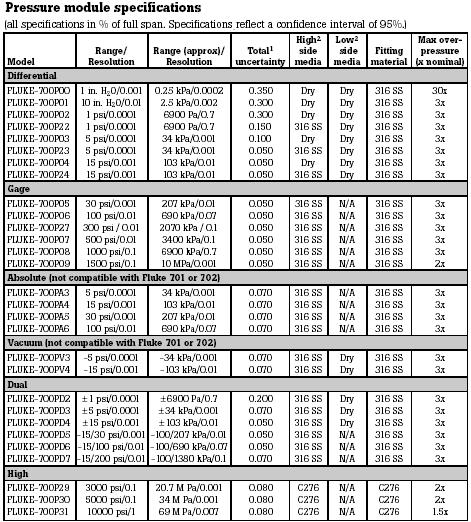
Fluke 700P Pressure Modules

Features:
- Display pressure readings in any of 10 different pressure units you specify in the calibrator setup
- Rugged urethane molded case protects the module from rough handling and harsh conditions
- Features internal temperature compensation from 0 C to 50 C for full-accuracy performance
- Includes NIST-traceable calibration certificate
- Module can be calibrated locally using the Fluke 700PCK Pressure Calibration Kit, a PC, and a precision pressure source
- One year warranty
 Order Modules By Individual Part Number Located in the First Column of the Above Table